 |
| The style of distaff dressing that we are aiming for. (Luttrell Psalter, BL Add. MS 42130, f.166v - source). |
Step 1: Measure out a length of commercially prepared roving. Approximately an arm's length is my preferred length. If I want to use more, I tend to use multiple separate arms-lengths rather than a single longer length. (You can alternatively use sliver drawn straight off wool combs - this is vastly more historical and also drafts better!)
 |
| This is commercially prepared Corriedale roving from Wingham Woolworks. |
Step 2: Gently draft out one end of the arms-length of roving or sliver until you have a dense twisted point approximately 3-5 cm long and 5-7 mm wide at its tip. You can give it a little twist, if you like, to add strength.
Step 3: Tie a length of ribbon at least 115 cm long to the end of the distaff, so that one ribbon end is long and the other is about 5-8 cm.
 |
| My distaff has two convenient knots which the ribbon sits between. Yours may need a notch. |
Step 4: Lay the pointed tip of the roving or sliver on the knot
Step 5: Tie the ribbon ends over it to firmly secure it in place.
Step 6: Wind the roving or sliver up and down the distaff in a similar pattern to how you would wind thread on a spindle when creating an ovoid cop. Make sure you finish at the bottom of the wound fibre. Also, make sure the long end of the ribbon does not get involved in this step! It will take practice to get the tension right so the roving or sliver is firmly enough in place that it will not unwind whilst being loose enough that it does not overly compress the fibres and impede drafting. The tension will also depend on the fibre and its prep.
 |
| I tend to hold the distaff in my dominant hand and the fibre in my non-dominant hand and wind by turning the distaff. |
 |
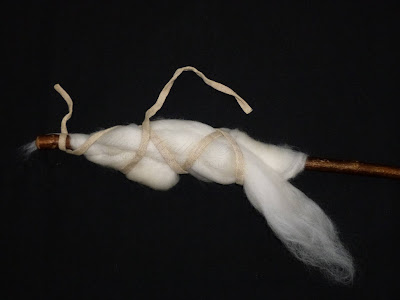
| Wind up and down until all the fibre is wound. Smaller amounts of fibre tend to look like this, whilst larger amounts look more ovoid. |
Step 7: Wind the long end of the ribbon around the fibre in a descending spiral (and up and down again in spirals, as necessary). Again, it will take practice to obtain an optimal tension here.
Step 8: Finish by tucking the end of the ribbon back through itself.
Use the dressed distaff with a distaff spinning technique, drafting from the end of the roving or sliver. Once you have used a hands-length or so of roving or sliver you will probably have to untie the ribbon and adjust the fibre moderately frequently to ensure the end of the roving or sliver is always optimally placed for drafting. This may not be so critical if you are making a more woollen (rather than worsted) thread and therefore are happy to draft fibres in a more disorganised fashion rather than having the fibres parallel to the thread.
Whilst the above example of this technique does not look much like any historic image of a dressed distaff, this is not the fault of the technique. If you use more fibre, it will look more like the historic images. Also, if you use hand-combed sliver rather than commercially-prepped roving it will look more like the historic images. I just used the minimum amount of roving as that's what I had on hand today! ^_^
 |
| An example of a distaff I dressed with combed sliver in a greater quantity for a museum display. I think this looks quite similar to the Luttrell Psalter image shown at the start of this tutorial. |
~:~
I hope this method is helpful for you. It is a particularly good method for no-fuss use of roving and for distaff spinning with (comparatively) small quantities of fibre. If you end up giving it a go, please do let me know!


Thank you for this instructive text. This method would, probably, also work well with flax. Have you tried that?
ReplyDeleteI've not tried much flax spinning, personally.
Delete